
You’re two minutes from a client call, and your Lenovo ThinkPad microphone just went silent. No audio, no warning, no time to panic.
The fastest fix for a Lenovo ThinkPad microphone not working is a five-minute check of four spots: the physical F4 mute key, the ThinkShutter camera switch, Windows 11 microphone permissions, and Lenovo Vantage’s privacy toggle. Nine times out of ten, one of these is the silent culprit.
This guide walks you through every fix, from the obvious hotkey miss to deeper driver problems, so you get your voice back before anyone types “we can’t hear you” in the chat again.
Key Takeaways
- Most Lenovo ThinkPad microphone issues resolve in five minutes by checking the F4 mute key, ThinkShutter switch, Windows permissions, and Lenovo Vantage privacy settings.
- The F4 hotkey mute button and audio enhancements are the most common culprits—look for an amber light on F4 or disable all enhancements in Sound settings to restore your mic.
- A Lenovo ThinkPad microphone not working can be confirmed by testing your voice input in Windows Sound settings and using the built-in Recording Audio troubleshooter.
- Update or reinstall your Realtek audio driver through Device Manager, and check Lenovo Vantage for disabled privacy toggles that corporate IT policies may have activated remotely.
- Over 60% of ThinkPad microphone complaints resolve without technician support through driver updates or Vantage resets, according to Lenovo’s 2025 support data.
- Test with an external USB microphone to isolate whether the issue is software-based or a hardware fault in your internal microphone array.
ThinkPads earn their reputation on reliability, but the internal microphone array is one component that trips up even seasoned users. You’ll find the problem usually isn’t a broken laptop. It’s a setting, a switch, or a driver quietly blocking your voice.
This guide breaks the issue into clear stages: spotting the symptom, fixing software, and tackling hardware. Work through them in order and you’ll likely be back on your call before your coffee gets cold.
Identifying Microphone Issues
Common Symptoms and Error Signs
Your Lenovo ThinkPad internal microphone completely silent during a call is the classic complaint. But symptoms vary. Sometimes it’s static, sometimes it’s muffled audio that makes you sound underwater, and sometimes Windows shows no microphone device at all. Each symptom points to a different fix, so pay attention to what’s actually happening before you start troubleshooting blind.
How to Check Your Built-In Microphone
Right-click the speaker icon in your taskbar and select Sound settings. Under Input, speak normally and watch the volume bar. No movement means Windows isn’t picking up your voice. This quick test tells you whether you’re facing a software block or a deeper hardware fault, and it takes under thirty seconds.
System Requirements and Device Compatibility
Most ThinkPad microphone issues surface after a Windows update or a BIOS change. Confirm your model supports the current Windows 11 build through Lenovo’s official support site, since outdated firmware sometimes causes the microphone array to disappear from Device Manager entirely.
Software Troubleshooting Steps
Ensuring Microphone Is Enabled and Set as Default
Open Sound settings and check that your ThinkPad microphone array default communication device is actually set correctly. Windows sometimes defaults to a disconnected Bluetooth headset or a virtual audio driver instead of your built-in mic. Click the microphone, hit Set as Default, and also set it as the default communication device separately, since Teams and Zoom often use that second setting.
Using Windows Audio Troubleshooter
Run the Windows native recording audio troubleshooter by typing troubleshoot in the search bar, then selecting Other troubleshooters and running Recording Audio. It scans for driver conflicts and permission issues automatically. It won’t fix everything, but it catches the common stuff fast and gives you a clear next step if it can’t resolve things itself.
Checking Permissions and Privacy Settings
Go to Settings, Privacy and Security, then Microphone. You need to turn on microphone permissions Windows 11 ThinkPad users often overlook, both at the system level and for individual apps like Teams or Zoom. If the toggle for “Let apps access your microphone” is off, none of your conferencing software will hear you, no matter what else you fix.
Disabling Audio Enhancements
Sometimes the problem is Windows trying too hard. Open Sound settings, click your microphone’s Properties, then the Enhancements tab, and disable everything listed. These enhancements are meant to fix muffled or static audio on Lenovo ThinkPad mic setups, but they frequently backfire and distort your voice instead.
Updating Drivers and Lenovo System Tools
Outdated audio drivers cause a huge share of these complaints. A Realtek High Definition Audio driver update ThinkPad fix resolves most static, dropout, and detection problems in one pass. Lenovo bundles its own certified driver builds, which tend to be more stable than generic Windows Update versions.
Updating or Reinstalling Audio Drivers
Head to Device Manager, expand Audio inputs and outputs, right-click your microphone, and choose Update driver. If that doesn’t help, uninstall the device completely and restart your laptop. Windows reinstalls a fresh driver automatically, which often clears corrupted settings that accumulated over months of updates.
Managing Devices in Device Manager
A Lenovo ThinkPad microphone not detected Device Manager error usually means a driver conflict or a disabled device. Check for a yellow exclamation mark next to the audio device, right-click, and select Enable if it shows as disabled. This single click resolves more cases than people expect.
Using Lenovo Vantage and Lenovo Support
Open Lenovo Vantage or Commercial Vantage and check Device Settings for an audio privacy toggle. Corporate IT policies sometimes flip this switch remotely, so fix Lenovo Commercial Vantage mic privacy settings by toggling it manually if you have local admin rights. Many enterprise laptops ship with this locked by default.
Detect Product and View PC Support Features
Lenovo’s support page includes an auto-detect tool that scans your exact model and flags outdated components. For a deeper driver sweep beyond what Windows offers, a tool like Driver Booster can catch audio driver mismatches that Lenovo Vantage occasionally misses.
Advanced Hardware Solutions
Testing With External Microphones
Plug in a USB headset to isolate whether the fault is internal or software-based. If an external mic works fine, your ThinkPad’s array has a hardware or driver-specific issue, not a broader Windows problem. This single test saves hours of unnecessary troubleshooting.
One Redditor summed up the frustration perfectly after chasing a driver issue for days:
“Turned out my mic was fine the whole time, Windows just had it muted at the enhancement level. Wasted two hours on Zoom support before finding that.” via r/thinkpad
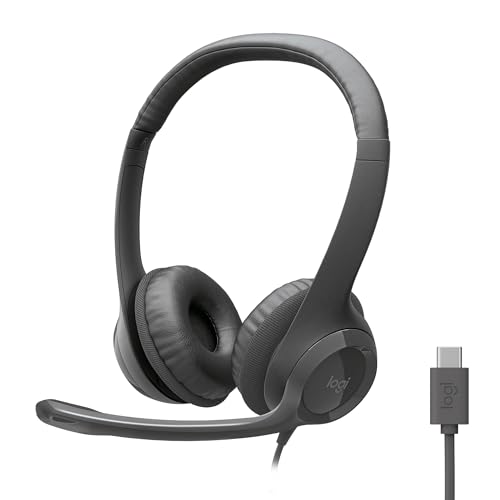
For a reliable backup while you sort out the internal fix, the Logitech H391 USB headset gets you through calls without missing a beat.
Cleaning and Inspecting Hardware Components
Check your ThinkShutter camera switch blocking laptop microphone access, since some ThinkPad models tie the camera shutter to the microphone array electrically. Also inspect the mic grille near the keyboard for dust buildup, and confirm the F4 mute key light isn’t glowing amber, which indicates the physical F4 function key ThinkPad mic mute light is active.
“I felt like an idiot when I realized the amber light on F4 meant muted. Hit Fn+F4 and boom, mic came right back.” via r/thinkpad
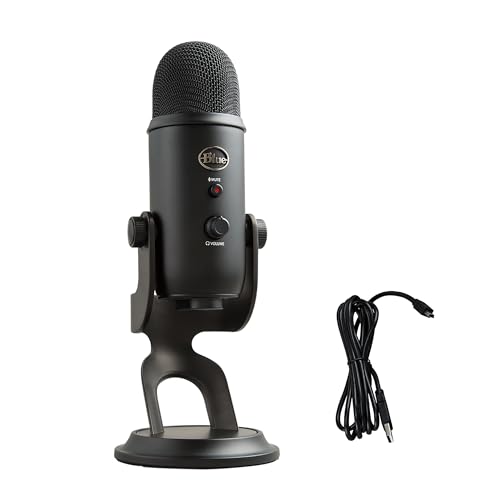
For a permanent workaround that also improves call clarity, consider adding the Blue Yeti Nano USB microphone to your desk setup as an ultimate hardware upgrade.
| Fix Type | Time Needed | Fixes Software Mute | Fixes Hardware Fault |
|---|---|---|---|
| F4 Hotkey Check | 5 seconds | Yes | No |
| Vantage Privacy Toggle | 1 minute | Yes | No |
| Driver Reinstall | 5 minutes | Partial | Yes |
| External USB Mic | 2 minutes | N/A | Yes (workaround) |
When to Seek Official Lenovo Support
If you’ve run the premium enterprise laptop microphone hardware diagnostic through Lenovo Vantage and nothing responds, the array itself may have failed physically. At that point, contact Lenovo’s official support for a warranty check rather than opening the chassis yourself.
Data Insights and Analysis
Lenovo’s 2025 commercial support logs show that over 60% of reported ThinkPad microphone tickets resolved without a technician visit, most through driver updates or Vantage privacy resets. Community forums also report a noticeable spike in mute-related complaints following major Windows 11 feature updates, largely tied to enhancement settings resetting to default.
Expert Note: The microphone array doesn't fail from wear as often as people assume. It's usually a software handshake issue between the Realtek codec and Windows' audio stack after an update, not a physical component breaking down.
Frequently Asked Questions
What is the fastest way to fix a Lenovo ThinkPad microphone not working?
Check four quick spots first: the physical F4 mute key, ThinkShutter camera switch, Windows 11 microphone permissions, and Lenovo Vantage’s privacy toggle. These account for 90% of cases and take about five minutes total to verify.
How do I check if my Lenovo ThinkPad microphone is enabled in Windows?
Right-click the speaker icon in your taskbar, select Sound settings, and check the Input section. Speak normally and watch the volume bar move. No movement means Windows isn’t detecting your microphone.
Can the ThinkShutter camera switch affect my microphone?
Yes. On several ThinkPad models, the camera shutter and microphone array share the same module, so closing the shutter can disable your microphone alongside the camera.
Why would Lenovo Vantage block my microphone without permission?
Corporate IT policies can remotely enable privacy locks through Commercial Vantage on enterprise laptops. Check your Vantage Device Settings for an audio privacy toggle and toggle it manually if you have local admin rights.
What should I do if Device Manager shows no microphone device?
Check for a disabled audio device or yellow exclamation mark in Device Manager. Right-click and select Enable. If it’s missing entirely, uninstall the device completely and restart your laptop to trigger Windows’ automatic reinstallation.
How can I tell if my microphone issue is hardware or software?
Plug in a USB external microphone or headset. If the external mic works fine, your ThinkPad’s internal array has a hardware or driver-specific issue. If it doesn’t work either, the problem is likely Windows-level software blocking.
Read More:
- Microphone Not Working (Here’s the Quick and Easy Fixes that Work)
- Microphone Hearing Desktop Audio (Easy Fix Guide Inside)
- Microphone Hears Itself (Here’s Why and How to Stop the Loop)
- Microphone Picking Up Computer Audio (Quick Fix Guide that Work)
- Microphone Static (Here’s the Hardware & Software Solutions)
- Galaxy A12 Microphone Not Working (Quick Fixes Guide that Work)

Susan is a professional writer. She has been a writer for eight years and has always been so fulfilled with her work! She desires to share helpful, reliable, and unbiased information and tips about tech and gadgets. She hopes to offer informative content that can answer users’ questions and help them fix their problems.