
You just finished what felt like the perfect podcast episode or voiceover take. But during playback, there’s a hollow, distant quality, like you recorded inside a cave. That’s microphone echo, and it destroys professional audio quality faster than background noise.
Microphone echo in recordings occurs when sound waves from your voice bounce off hard surfaces (walls, ceilings, desks) and return to the microphone milliseconds after the direct sound, creating a hollow, doubled, or washed-out quality. Common culprits include untreated rooms with reflective surfaces, improper microphone placement, excessive gain settings, or software monitoring loops that feed delayed audio back into the recording chain.
Understanding echo sources and applying targeted fixes, whether acoustic treatment, repositioning your mic, or using dereverb plugins, transforms amateur-sounding recordings into broadcast-ready audio. Let’s break down exactly what’s happening and how to eliminate echo from your workflow.

Key Takeaways
- Microphone echo occurs when sound waves bounce off hard surfaces like walls and desks, returning to the mic milliseconds later and creating a hollow, doubled audio quality that requires targeted acoustic treatment or repositioning.
- Distinguish between true echo (distinct delayed repetition), reverb (smooth continuous tail), and feedback (amplified loop), as each requires a different solution—most home recording complaints are actually excessive reverb from untreated rooms.
- Prevent microphone echo by treating your space with absorptive materials like blankets or acoustic foam at first-reflection points, positioning your mic asymmetrically in the room, and maintaining proper mic distance and gain settings.
- Identify echo problems using critical listening on quality headphones and the clap test, then analyze waveforms in your DAW to see if secondary peaks indicate true echo or a gradual tail indicates reverb.
- When prevention fails, use post-production tools like Adobe Audition’s DeReverb, iZotope RX’s AI-powered De-reverb, or Adobe Podcast Enhance Speech to reduce echo by 60-80%, though prevention always yields superior results.
What Is Microphone Echo and Why Does It Happen?
Echo is delayed repetition of your original sound. When you speak into a microphone in an untreated room, sound waves travel outward in all directions. Those waves hit walls, floors, ceilings, and furniture, then bounce back to the microphone. If the delay between direct sound and reflected sound exceeds approximately 30-50 milliseconds, your brain perceives it as distinct echo rather than reverb.
Hard surfaces reflect sound efficiently. Drywall, glass windows, wooden desks, and tile floors act like acoustic mirrors. A typical bedroom or home office has parallel walls that create flutter echo, rapid repeating reflections bouncing between opposing surfaces. Your microphone captures both your direct voice and these delayed reflections, layering them into the recording.
The Science Behind Audio Reflections
Sound travels at roughly 1,130 feet per second (344 meters per second) at room temperature. In a 10×12 foot room, a sound wave hits the opposite wall and returns in about 20 milliseconds. If your microphone is positioned mid-room, it captures the direct signal, then the first reflection at ~20ms, second bounce at ~40ms, and subsequent reflections that decay over 200-500ms depending on surface absorption.
Dynamic microphones with cardioid polar patterns reject some off-axis reflections, but condenser mics, popular for vocals and podcasts, capture a wider field. Their sensitivity picks up room reflections you wouldn’t notice during recording. Sample rate and buffer settings don’t cause this type of echo: it’s purely acoustic physics. But, condenser mics in untreated rooms amplify the problem because they capture every reflection with high fidelity.
Distance matters exponentially. Moving your mic twice as far from a reflective wall doesn’t double the reflection path, it increases delay and allows more diffuse reflections to reach the capsule. The inverse square law means reflections lose energy over distance, but in small rooms with parallel surfaces, those reflections remain strong enough to muddy your recording.
Echo vs. Reverb vs. Feedback: Understanding the Differences
These three acoustic phenomena confuse many beginners, but they’re distinct problems requiring different solutions.
Echo is a discrete, delayed repetition of sound. You hear your word, then hear it again 50-200ms later as a distinct copy. Think of shouting in a canyon, you hear a clear delayed version. In recordings, echo sounds like a doubled vocal track slightly out of sync.
Reverb (reverberation) is a dense cluster of reflections happening so rapidly they blend into a continuous tail. Instead of distinct repeats, you get a smooth wash or ambience. Cathedral reverb might last 3-5 seconds: bedroom reverb decays in 300-600ms. Reverb makes vocals sound distant, hollow, or like they were recorded in a bathroom.
Feedback is a loop where the microphone picks up its own output from speakers or headphones, amplifies it, and sends it back through the system in a continuous cycle. This creates the howling, screeching sound you’ve heard at live events. In recording scenarios, feedback happens when you monitor through speakers instead of headphones while recording, or when software monitoring is enabled and creating a digital feedback loop.
| Issue | Cause | Sound Character | Primary Fix |
|---|---|---|---|
| Echo | Hard surface reflections, 50-200ms delay | Distinct repeated words | Acoustic treatment, mic positioning |
| Reverb | Dense early reflections, room ambience | Hollow, washed-out, distant quality | Absorptive materials, dereverb plugins |
| Feedback | Mic picks up its own amplified output | High-pitched squeal or howl | Disable monitoring, use headphones |
Most home recording complaints about “echo” are actually excessive reverb. True echo requires larger spaces or specific parallel surface arrangements. Identifying which problem you face determines your solution approach.
Common Causes of Microphone Echo in Recording Environments
Room Acoustics and Hard Surfaces
Your recording environment is often the primary culprit. Spare bedrooms, basements, and home offices typically feature drywall walls, hardwood or tile floors, large windows, and minimal soft furnishings. These materials reflect 90-98% of sound energy. When you record in such a space, every syllable bounces around the room before dying out.
Parallel walls create flutter echo, a rapid “boing” sound when you clap your hands. Corners accumulate low-frequency energy, creating bass buildup that muddies your recording. High ceilings extend reflection paths, increasing reverb time. Even your desk surface reflects high frequencies directly back into the microphone capsule.
“Recorded my first podcast episode in my kitchen because it was quiet. Every word echoed like I was in a warehouse. Moved to a carpeted bedroom with a closet full of clothes and the difference was night-and-day.” via r/podcasting
The material composition of your room determines reflection characteristics. Glass and tile reflect the full frequency spectrum. Drywall absorbs almost nothing below 500Hz. Carpet helps with high frequencies but barely touches mids and lows. Without deliberate acoustic treatment, residential spaces produce 400-800ms of reverb tail, enough to make dialogue sound unprofessional.
Microphone Placement and Gain Issues
Incorrect microphone positioning compounds acoustic problems. Placing your mic in the center of a room maximizes exposure to reflections from all surfaces. Positioning it close to a wall creates early reflections arriving only 5-10ms after direct sound, causing comb filtering, a hollow, phased quality.
Excessive gain settings force your microphone to capture quieter sounds, including room reflections. If you set input gain so high that you’re 6-8 inches from the mic, you’re capturing more room than voice. Proper gain staging means speaking 3-4 inches from a dynamic mic or 6-8 inches from a condenser, with input levels peaking around -12dB to -6dB.
Condenser microphones capture more room ambience than dynamics. Their extended frequency response and sensitivity make them excellent for vocals but merciless in untreated spaces. A Shure SM58 dynamic mic in a bare room sounds cleaner than an Audio-Technica AT2020 condenser in the same space because the dynamic pattern and lower sensitivity reject more reflections. Choosing the wrong mic type for your environment creates echo problems before you press record.
How to Identify Echo Problems in Your Recordings
Listen critically during playback. Put on reference-quality headphones and play back your raw recording. True echo manifests as a distinct repeat of consonants, especially hard sounds like “T,” “K,” and “P.” You’ll hear the initial attack, then a delayed copy 50-150ms later. Reverb sounds like a smooth tail extending after you stop speaking, making the space sound larger than it is.
Use the clap test in your recording space. Stand where you normally record and clap your hands sharply once. Listen carefully. A single clean clap indicates good acoustic control. Multiple rapid echoes (flutter) or a long ringing tail (reverb) reveal problems. Record this clap test with your microphone at normal gain settings. Analyze the waveform in your DAW.
In Audacity or Adobe Audition, zoom into the waveform after a spoken word or clap. You should see the initial transient peak, then amplitude dropping quickly to near-silence within 100-200ms. If you see secondary peaks 50-100ms after the main peak, that’s discrete echo. If the waveform stays elevated for 300-800ms with gradually decreasing amplitude, that’s reverb.
Software monitoring loops create a different signature. If you hear your voice doubled or slightly delayed while recording (in real-time monitoring), but the recorded file sounds fine, that’s a monitoring issue, not acoustic echo. Check your DAW settings: disable “Software Playthrough” in Audacity or turn off “Input Monitoring” on your track in Adobe Audition. This prevents the software from feeding your input back through your headphones with a 10-30ms delay caused by buffer latency.
Preventing Microphone Echo Before You Record
Acoustic Treatment Solutions for Your Space
Address reflections at the source. You don’t need expensive acoustic foam to dramatically reduce echo. Start with what you have: hang heavy blankets or moving blankets on walls behind and beside your recording position. Drape a thick comforter over a mic stand to create an absorption flag behind your microphone. These DIY solutions absorb mid and high frequencies where echo is most noticeable.
Record in or near a closet filled with hanging clothes. Fabrics are excellent broadband absorbers. Voice actors often build “blanket forts” or record inside closets for quick vocal isolation. Position your microphone facing into the closet, with clothes creating a dense absorption zone behind the capsule. This prevents reflections from the opposite wall from reaching the mic.
For a permanent solution, consider acoustic foam panels placed at first reflection points, the spots on walls where sound bounces directly from you to the wall and back to the mic. Use the mirror trick: sit at your recording position and have someone hold a mirror against the wall. When you can see the microphone in the mirror, that’s a reflection point. Place 2-inch foam or fabric panels there.
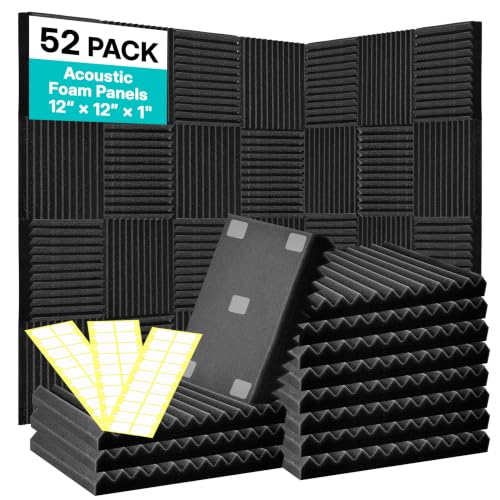
Bass traps in corners control low-frequency buildup that creates muddiness. Commercially available bass traps work best, but stacking dense cushions or pillows in corners provides budget-friendly improvement. Combine absorption (foam, fabric) with diffusion (bookshelves, irregular surfaces) to avoid making the room sound unnaturally dead.
Optimal Microphone Technique and Positioning
Position your microphone asymmetrically in the room. Never place it centered between parallel walls. Instead, position it about 38% of the room’s length from the front wall, this minimizes standing wave interaction. Keep the mic at least 3-4 feet from the nearest hard surface to ensure reflections arrive delayed enough that they’re weaker in amplitude.
Use a microphone isolation shield behind your mic. These curved foam devices create a semi-treated zone, absorbing reflections from behind the microphone. They’re most effective for reducing early reflections from the wall behind you but won’t eliminate all room sound.

Adjust your recording technique:
- Speak 3-4 inches from dynamic mics, 6-8 inches from condensers
- Position the mic slightly off-axis (15-30 degrees) to reduce plosives and direct reflections
- Use a pop filter to maintain consistent distance
- Set input gain so you peak at -12dB to -6dB, reducing sensitivity to quiet room reflections
- Record in mono (single channel) for voice to avoid stereo imaging that emphasizes room ambience
If you’re experiencing persistent issues, consider whether NordVPN can protect your online research for acoustic solutions and software downloads. Secure connections ensure you’re accessing legitimate audio software sources.
Stay Private. Stay Secure.
Browse the internet with greater privacy and security with NordVPN. Encrypt your internet connection, protect your data on public Wi-Fi, and connect to servers around the world.
Get NordVPNRemoving Echo From Existing Recordings Using Software
When prevention fails, post-production tools can rescue your audio. Adobe Audition includes a DeReverb effect specifically designed to reduce room reflections. Open your file, select Effects → Reverb → DeReverb. Start with the “Reduce Reverb by 50%” preset and adjust the Reverb Time slider to match your room (typically 400-800ms for small rooms). The algorithm analyzes the reverb tail and suppresses it while preserving the direct signal.
In Audacity, the free GVerb plugin can’t remove echo, but you can try high-pass filtering combined with noise reduction. Use Effect → Noise Reduction in two-pass mode: select a silent section with only room reflections, click “Get Noise Profile,” then select the entire file and apply reduction at 6-12dB. This won’t eliminate echo but reduces its amplitude.
AI-powered dereverb plugins deliver superior results. iZotope RX 11 includes De-reverb and Dialogue De-reverb modules that use machine learning to distinguish direct signal from room reflections. Load your audio into RX, apply the De-reverb module, and adjust the Reduction amount (start at 6-9dB). The algorithm adapts to your specific room characteristics.
For severe echo, try Adobe Podcast Enhance Speech, a free AI tool that processes voice recordings to remove room echo and background noise. Upload your audio file (MP3 or WAV), and the algorithm processes it automatically. Results vary, but it often rescues otherwise unusable recordings.
Sample rate mismatches don’t create echo, but they do cause playback issues. Ensure your DAW project sample rate (44.1kHz or 48kHz) matches your audio interface settings. Mismatches cause playback speed variances, not true echo, but can create timing confusion during editing.
Remember: software can reduce echo by 60-80%, but it can't create information that wasn't captured. Prevention through proper recording technique and acoustic treatment always yields superior results. Use plugins as a last resort for already-recorded material, not as a primary workflow solution.
Frequently Asked Questions
What causes microphone echo in recordings?
Microphone echo occurs when sound waves bounce off hard surfaces like walls, ceilings, and desks, then return to the microphone milliseconds later. Common causes include untreated rooms with reflective surfaces, improper microphone placement, excessive gain settings, and software monitoring loops that create feedback delays.
How can I tell the difference between echo, reverb, and feedback?
Echo is a distinct, delayed repetition of sound (50-200ms). Reverb is dense, rapid reflections that blend into a smooth tail, making audio sound hollow or distant. Feedback is a continuous loop creating a high-pitched squeal or howl when the mic picks up its own amplified output from speakers or headphones.
What’s the best way to eliminate microphone echo before recording?
Use acoustic treatment like hanging blankets or recording in a closet with clothes, position your mic asymmetrically in the room at least 3-4 feet from hard surfaces, and maintain proper gain settings (peaking at -12dB to -6dB). These prevention methods are more effective than post-production fixes.
Can I remove microphone echo from recordings after the fact?
Yes, dereverb plugins like Adobe Audition’s DeReverb or iZotope RX 11 can reduce echo by 60-80%. Free options include Adobe Podcast Enhance Speech. However, software can’t restore lost information, so prevention through proper technique and acoustic treatment yields superior results.
Does microphone type affect echo in untreated rooms?
Yes. Condenser microphones capture more room reflections due to their higher sensitivity and extended frequency response, making microphone echo worse in untreated spaces. Dynamic microphones with cardioid patterns reject more off-axis reflections, making them better for bare rooms.
What’s the mirror trick for finding reflection points in my room?
Sit at your recording position and have someone hold a mirror against the wall. When you can see your microphone reflected in the mirror, that’s a first reflection point. Place acoustic foam or fabric panels at these locations to absorb bouncing sound waves before they reach your mic.
Read More:
- Eufy Camera Microphone Not Working (Quick and Easy Fixes)
- Microphone Echo (Here the Ultimate Guide to Fix the Issue)
- Microphone Echo Without Speakers Connected (Here’s How to Fix It Fast)
- Microphone Echo But Headphones Are Fine (Fix Audio Bleed Fast)
- Microphone Echo With Headphones (Quick & Simple DIY Fixes)

Susan is a professional writer. She has been a writer for eight years and has always been so fulfilled with her work! She desires to share helpful, reliable, and unbiased information and tips about tech and gadgets. She hopes to offer informative content that can answer users’ questions and help them fix their problems.